4. Dashboard
The Dashboard is the main landing page. By default it lists your mapped models,
as defined by your Admin services. This is useful to help you start using
SonataAdminBundle right away, but there is much more that you can do to take
advantage of the Dashboard.
The Dashboard is, by default, available at /admin/dashboard, which is handled by
the Sonata\AdminBundle\Action\DashboardAction controller action. The default view file for
this action is @SonataAdmin/Core/dashboard.html.twig, but you can change
this in your admin configuration:
# config/packages/sonata_admin.yaml

sonata_admin:
    templates:
        dashboard: '@SonataAdmin/Core/dashboard.html.twig'
Note
This view, like most of the SonataAdminBundle views, extends a global
template file, which also contains significant parts to the page. More information
about this is available in the Templates chapter.
4.1. Blocks
The Dashboard is actually built using Blocks from SonataBlockBundle. You
can learn more about this bundle and how to build your own Blocks on the
SonataBlock documentation page.
4.2. The Admin list block
The Admin list is a Block that fetches information from the Admin service’s
Pool and prints it in the nicely formatted list you have on your default Dashboard.
The Admin list is defined by the sonata.admin.block.admin_list service, which is
implemented by the Block\AdminListBlockService class. It is then rendered using the
@SonataAdmin/Block/block_admin_list.html.twig template file.
Feel free to take a look at these files. The code will be a great help when implementing your own blocks.
4.3. Configuring the Admin list
As you probably noticed by now, the Admin list groups Admin mappings together.
There are several ways in which you can configure these groups.
By default the admins are ordered the way you defined them. With the setting sort_admins
groups and admins will be ordered by their respective label with a fallback to the admin id.
4.3.1. Using the Admin service declaration
The first, and most commonly used, method is to set a group when defining your Admin
services:
# config/services.yaml

services:
    app.admin.post:
        class: App\Admin\PostAdmin
        tags:
            - { name: sonata.admin, model_class: App\Entity\Post, manager_type: orm, group: 'Content', label: 'Post' }
In these examples, notice the group tag, stating that this particular Admin
service belongs to the Content group.
# config/services.yaml

services:
    app.admin.post:
        class: App\Admin\PostAdmin
        tags:
            - name: sonata.admin
                model_class: App\Entity\Post
                manager_type: orm
                group: 'app.admin.group.content'
                translation_domain: 'App'
                label: 'app.admin.model.post'
In this example, the label are translated by App, using the given
translation_domain. So, you can use the above examples to support multiple languages
in your project.
Note
You can use parameters (e.g. %app_admin.group_post%) for the group names
in either scenario.
4.3.2. Using the sonata_admin.yaml config file
You can also configure the Admin list in your sonata_admin.yaml config file. This
configuration method overrides any settings defined in the Admin service
declarations.
# config/packages/sonata_admin.yaml

sonata_admin:
    dashboard:
        groups:
            app.admin.group.content:
                label: app.admin.group.content
                translation_domain: App
                items:
                    - app.admin.post

            app.admin.group.blog:
                items:
                    - sonata.admin.page
                roles: ['ROLE_ONE', 'ROLE_TWO']

            app.admin.group.misc: ~
Note
This is an academic, full configuration, example. In real cases, you will usually
not need to use all the displayed options. To use a default value for any setting
either leave out that key or use the ~ value for that option.
This configuration specifies that the app.admin.group.content group uses the
app.admin.group.content label, which is translated using the App
translation domain (the same label and translation configuration that we declared
previously, in the service definition example).
It also states that the app.admin.group.content group contains only the
app.admin.post Admin mapping, meaning that any other Admin services
declared as belonging to this group will not be displayed here.
Secondly, we declare a app.admin.group.blog group as having all its default items
(i.e. the ones specified in the Admin service declarations), plus an additional
sonata.admin.page mapping, that was not initially part of this group.
We also use the roles option here, which means that only users with the ROLE_ONE
or ROLE_TWO privileges will be able to see this group, as opposed to the default setting
which allows everyone to see a given group. Users with ROLE_SUPER_ADMIN (or the role
specified in the configuration) are always able to see groups that would otherwise be hidden
by this configuration option.
The third group, app.admin.group.misc, is set up as a group which uses all its
default values, as declared in the service declarations.
4.4. Adding more Blocks
Like we said before, the Dashboard comes with a default Admin list block, but
you can create and add more blocks to it.
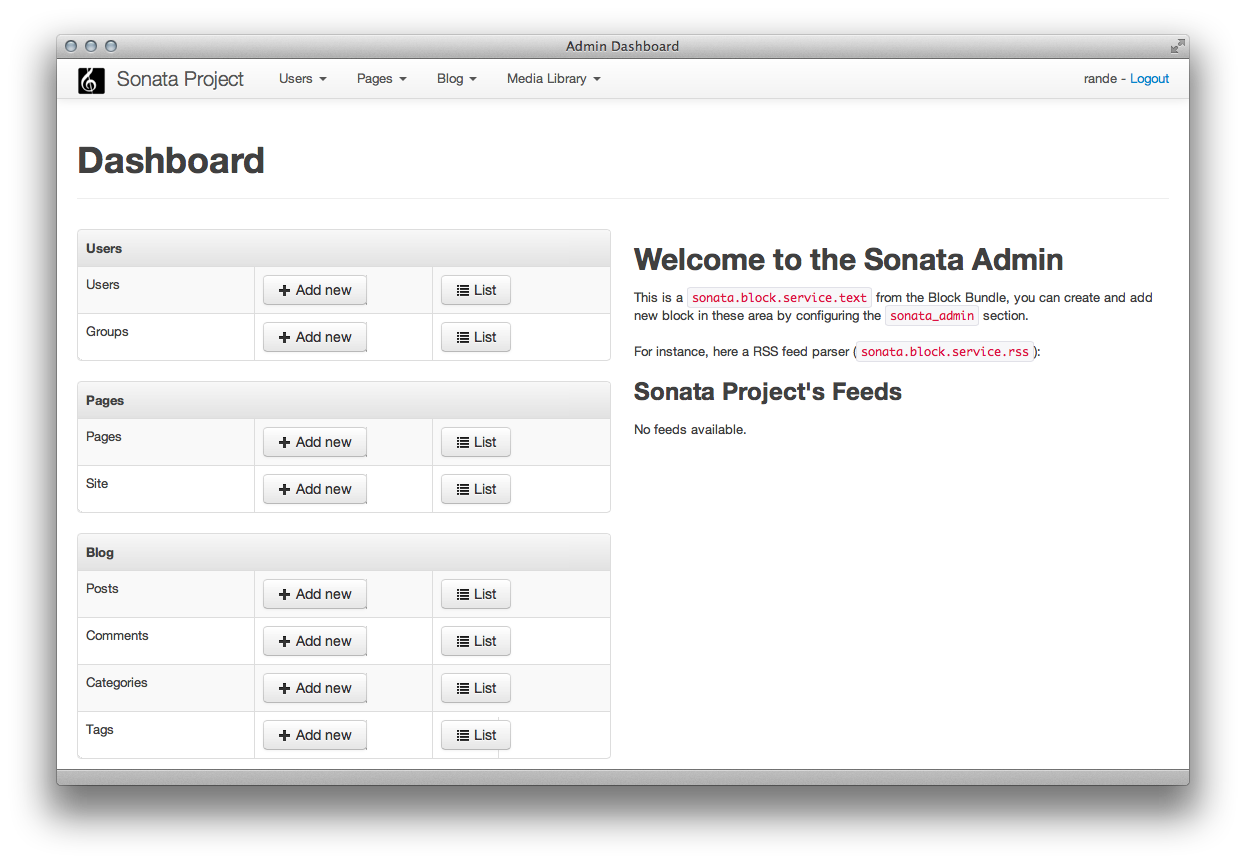
In this screenshot, in addition to the default Admin list block on the left, we added
a text block and RSS feed block on the right. The configuration for this scenario would be:
# config/packages/sonata_admin.yaml

sonata_admin:
    dashboard:
        blocks:
            -
                position: left
                type: sonata.admin.block.admin_list
            -
                position: right
                type: sonata.block.service.text
                settings:
                    content: >
                        <h2>Welcome to the Sonata Admin</h2>
                        <p>This is a <code>sonata.block.service.text</code> from the Block
                        Bundle, you can create and add new block in these area by configuring
                        the <code>sonata_admin</code> section.</p> <br/> For instance, here
                        a RSS feed parser (<code>sonata.block.service.rss</code>):
            -
                position: right
                type: sonata.block.service.rss
                roles: [POST_READER]
                settings:
                    title: Sonata Project's Feeds
                    url: https://sonata-project.org/blog/archive.rss
Note
Blocks may accept/require additional settings to be passed in order to work properly. Refer to the associated documentation/implementation to get more information on each block’s options and requirements.
You can also configure the roles section to configure users that can
view the block.
4.4.1. Display two Admin list blocks with different dashboard groups
The same block can have multiple instances, and be displayed multiple times
across the Dashboard using different configuration settings for each instance.
A particular example is the Admin list block, which can be configured to
suit this scenario.
# config/packages/sonata_admin.yaml

sonata_admin:
    dashboard:
        blocks:

            # display two dashboard blocks
            -
                position: left
                type: sonata.admin.block.admin_list
                settings:
                    groups: [sonata_page1, sonata_page2]
            -
                position: right
                type: sonata.admin.block.admin_list
                settings:
                    groups: [sonata_page3]

        groups:
            sonata_page1:
                items:
                    - sonata.page.admin.myitem1

            sonata_page2:
                items:
                    - sonata.page.admin.myitem2
                    - sonata.page.admin.myitem3

            sonata_page3:
                items:
                    - sonata.page.admin.myitem4
In this example, you would have two admin_list blocks on your dashboard, each
of them containing the respectively configured groups.
4.4.2. Statistic Block
A statistic block can be used to display a simple counter with a color, an font awesome icon and a text. A counter is related to the filters from one admin
# config/packages/sonata_admin.yaml

sonata_admin:
    dashboard:
        blocks:
            -
                class:    col-lg-3 col-xs-6          # twitter bootstrap responsive code
                position: top                        # zone in the dashboard
                type:     sonata.admin.block.stats   # block id
                settings:
                    code:  sonata.page.admin.page    # admin code - service id
                    icon:  fas fa-magic               # font awesome icon
                    text:  app.page.stats            # static text or translation message
                    color: bg-yellow                 # colors: bg-green, bg-red and bg-aqua
                    filters:                         # filter values
                        edited: { value: 1 }
The block configuration for settings.text accepts static text or a translation message,
which could also have a pluralized translation target:
<!-- messages.en.xlf -->

<trans-unit id="app.page.stats">
    <source>app.page.stats</source>
    <target>{0} results|{1} result|]1,Inf] results</target>
</trans-unit>
If you’re using ``symfony/translation`` >= 4.2, you can also opt in for the ICU Message Format
<!-- messages+intl-icu.en.xlf -->

<trans-unit id="app.page.stats">
    <source>app.page.stats</source>
    <target>{count, plural, =0 {results} one {result} other {results}}</target>
</trans-unit>
4.4.3. Preview Block
A preview block can be used to display a brief of an admin list.
# config/packages/sonata_admin.yaml

sonata_admin:
    dashboard:
        blocks:
            -
                position: top                              # zone in the dashboard
                type:     sonata.admin.block.admin_preview # block id
                settings:
                    code:  sonata.page.admin.page          # admin code - service id
                    icon:  fas fa-magic                     # font awesome icon
                    limit: 10
                    text:  Latest Edited Pages
                    filters:                               # filter values
                        edited:      { value: 1 }
                        _sort_by:    updatedAt
                        _sort_order: DESC
4.4.4. Dashboard Layout
Supported positions right now are the following:
top
left
center
right
bottom
The layout is as follows:
TOP     TOP     TOP

 LEFT CENTER RIGHT
 LEFT CENTER RIGHT
 LEFT CENTER RIGHT

BOTTOM BOTTOM BOTTOM
On top and bottom positions, you can also specify an optional class option to set the width of the block.
# config/packages/sonata_admin.yaml

sonata_admin:
    dashboard:
        blocks:

            # display dashboard block in the top zone with a col-md-6 css class
            -
                position: top
                class: col-md-6
                type: sonata.admin.block.admin_list
4.5. Configuring what actions are available for each item on the dashboard
By default. A “list” and a “create” option are available for each item on the
dashboard. If you created a custom action and want to display it along the
other two on the dashboard, you can do so by overriding the
configureDashboardActions() method of your admin class:
// src/Admin/PostAdmin.php

final class PostAdmin extends AbstractAdmin
{
    protected function configureDashboardActions(array $actions): array
    {
        $actions['import'] = [
            'label'              => 'Import',
            'url'                => $this->generateUrl('import'),
            'icon'               => 'import',
            'translation_domain' => 'SonataAdminBundle', // optional
            'template'           => '@SonataAdmin/CRUD/dashboard__action.html.twig', // optional
        ];

        return $actions;
    }
}
You can also hide an action from the dashboard by unsetting it:
// src/Admin/PostAdmin.php

final class PostAdmin extends AbstractAdmin
{
    protected function configureDashboardActions(array $actions): array
    {
        $actions = parent::configureDashboardActions();

        unset($actions['list']);

        return $actions;
    }
}
If you do this, you need to be aware that the action is only hidden. it will still be available by directly calling its URL, unless you prevent that using proper security measures (e.g. ACL or role based).